Level: ●○○○

Sunday, May 27, 2012
Monday, May 21, 2012
May Nail Tutorial: Sunflower design
Here is another simple & cute nail tutorial- if you want to see more, head to my "Tutorials" page and scroll down to the nail art section.
Level: ●●○○
Supplies:
 |
| For the base, I'm using "Blazed" by Wet n' Wild. I bought it on vacation for only $1.50 at a cute little store in Avalon, Catalina Island. Make sure it dries before you start the flower. |

 | |||||||
| Start with an electrical outlet cover and make sure you have a screw. |
| For the petals: Using the nail dotter, create a dot on your nail. Using a toothpick, start in the center of the dot and pull upwards. It should look like a teardrop. |

| Create another dot next to the petal you just completed and repeat the motion with the toothpick to shape the dot into a teardrop. |

 |
| Repeat to make a total of 5-7 petals. Let dry. |
 |
| Make a small glob of brown or green on the palette and dip the nail dotter once you have cleaned the other polish off of it. (Espresso by Revlon Top Speed) |
 |
| Make a big dot in the middle of the flower. You can stop here, but I used the toothpick to create more petals. |
 |
| With the toothpick dipped in the petal color, make short strokes starting from the center dot. Add a coat or two of clear top coat. |
 |
| That's all there is to it! Please comment if you have any questions & pleeease follow my blog! I would love to see a pic of your fave nail art as well :) |
Saturday, May 19, 2012
Lace Dress Reconstruction
My mom bought me a lace dress from Nordstrom Rack for $12! Except, I didn't like it at first...


Pin It Now!


 |
| First, I took off this sad lace flower with a seam ripper. |
 |
| Then, I cut off the lacy butterfly sleeves. |
 |
| I folded in the arm hole and sewed a hem for the sleeve. |
 |
| I added a favorite thrift find: a red elastic belt. Do you have some clothes that need some reconstructing?
Check out my tutorial archive here!
|
Wednesday, May 9, 2012
Tutorial: Hunger Games tee!

This tutorial uses a method called freezer paper stenciling. If you've never heard of it, please check out my other freezer paper post. If you are unsure about this complicating mocking jay pin design, you can attempt a simpler logo first or try it out on a cheap canvas bag.
Level: ●●●●
Supplies:
- Freezer paper- available @ grocery stores
- Mocking Jay image (enlarged & printed to your desired size.)
- X-acto knife/blade & cutting board
- Metallic gold acrylic or fabric paint, if using acrylic paint, stir in a fabric painting medium
- iron & ironing board
- card board or plastic object to stick in between layers of t-shirt or bag to prevent sticking and or bleeding
- T-shirt, canvas or cloth bag, apron or hat
- foam paint brushes
 |
| First, print out your image. Mocking Jay found here. |
 |
| Cut out a piece of freezer paper big enough for your printed image and tape/clip it on top of the printed image plastic side down, paper side up. Note: your image won't need to be reversed for this method. Trace every single line in the image on to the paper side of the freezer paper. |
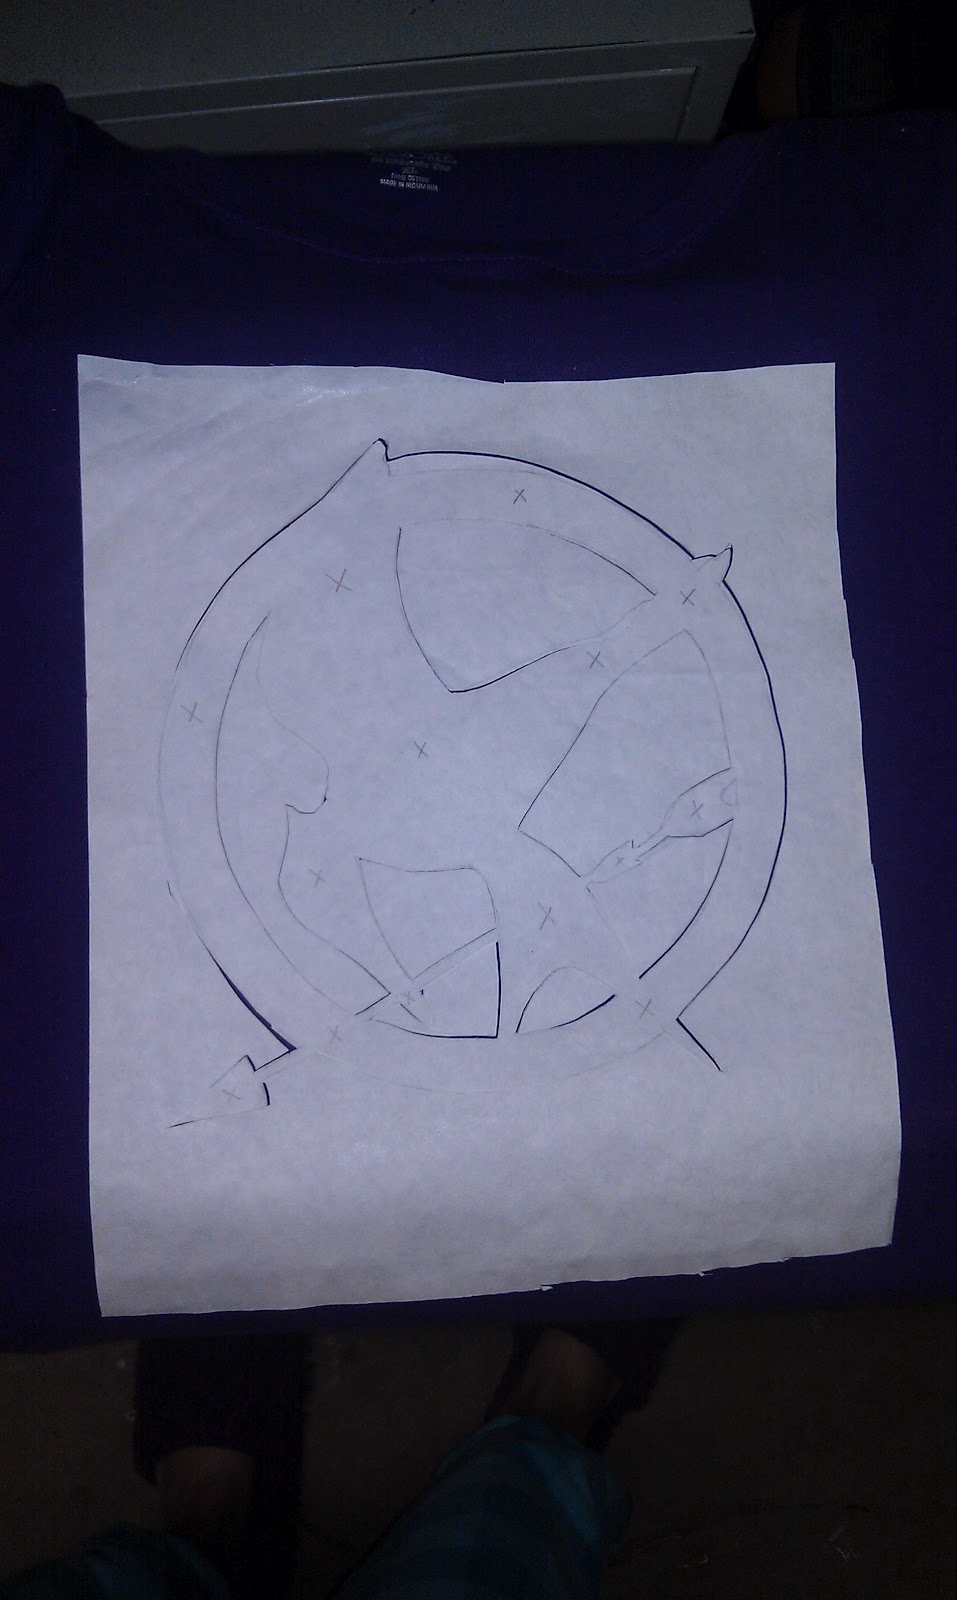 |
| Now for the hard part: you have to cut out each piece of the image very carefully on your cutting mat. This is why I suggest practicing with a simpler image first to get the hang of it. Place all the pieces on your shirt exactly where you want them to be. Iron them on carefully on medium-high heat for a minute and be sure to line everything up. |
 |
| Now, this is also tough, but if you cut out the image right, you will be able to peel the inner bird off the shirt. Make sure the outline stays in tact. Yep, you just created a stencil. (Use once for maximum results.) |
 |
| With the outline still ironed on, mix your paints to desired color and use a foam paint brush to generously apply paint inside stencil. Let dry for 2 hours and blow dry to seal paint. (The heat does it.) If you made it the morning of the day you saw the movie like me, keep blow drying! P.S. you'll smell like paint until you wash it! |
 |
| It came out sooo amazing the pic doesn't do it justice! I wore it to school and got 11 compliments! (pfft! I wasn't counting.) :D Would love to see a pic of your DIY Hunger Games attire!!! Be sure to check out THG shirt tutorial on Sweet Verbena! |
Monday, May 7, 2012
Inspiration: Vintage Polka Dot Dresses
Polka dots are on trend right now and have been "spotted" on several cute dresses like the ones below!
 | ||
| Katy Perry wearing Oscar de la Renta polka dot dress in Teen Vogue, May 2012. |
 |
| Here is Katy's Oscar de la Renta dress for a whopping $2,790! |
 |
| Here is a simpler option from the Daisy Shoppe, $49. |
 |
| And my dress, $38 from the Daisy Shoppe- complete with a peter pan collar & sash in front! |
 |
| An affordable option from Forever 21- $24.80 |
 |
| On a budget?- Ruffled polka dot dress from Forever 21- $14.80 |
Subscribe to:
Posts (Atom)