Saturday, December 28, 2013

{DIY} Sweater Makeovers

Have some boring old sweaters you'd like to update?
If not, head to your local thrift store or a friend's closet and pick up some plain sweaters!

In this video, I show you three ways to update/fix a sweater.
Here are the before and after pictures!


And here's the video!


Pin It Now!

Wednesday, December 25, 2013

Testing Out the Rainbow Loom

Happy Holidays, crafters!
~
This Christmas, my sister got the Rainbow Loom and we have been using it nonstop.
We only know how to make a few types of bracelets... but, I was wondering if anyone would be interested in seeing a video or a tutorial about them??


Pin It Now!

Sunday, December 15, 2013

Christmas Card Idea & Chocolate Covered Pretzels

Hey guys! 
Sorry I haven't posted in a while... I'm more active on my style blog: www.astyleblogofsomesort.blogspot.com
and my YouTube Channel: http://www.youtube.com/ucanrockcnd

 These are some cute Christmas tags I made super quickly last night!

 To make them, simply 1. Prepare your paper~ I used colorful index cards 2. Stamp a cute image such as a Christmas tree or the Eiffel Tower 3. Write a small greeting or message 4. Punch holes out of the corners, add ribbons, buttons, or trim.... etc.

ooOoo

Now for the sweet treats!

I received these from a friend and loved them SO MUCH that I had to make some and spread the deliciousness. They are thin pretzel crisps covered in white chocolate and topped off with crushed peppermint canes.

You will need: plain pretzels of your choice, wax paper or parchment paper, peppermint canes or candy, and white chocolate (melting wafers or chocolate bars work best).

First, melt the chocolate according to the package instructions. I didn't develop any method for this, but somehow dip the pretzel into the chocolate. I kind of just dunked it in the chocolate and scraped off the excess.

Plop the pretzels onto your parchment paper or wax paper and before the chocolate hardens, sprinkle them with crushed peppermints or candy canes.

Let them harden for a couple of hours...

or place them in the fridge to harden faster!

They're adorable and delicious! I put 4 in each cellophane bag, tied it up with a ribbon, and tied the tags I made onto them for a finishing touch. 

Pin It Now!

Friday, November 22, 2013

Flag to Table Runner

My mom's friend gave me a flag to upcycle into something fabulous...

Here is the result!


I added navy blue cotton fabric from Joann's to lengthen it and white pom-pom trim to either end.
Sorry, I don't have a tutorial for it because I honestly didn't think it would turn out!

Pin It Now!

Saturday, November 2, 2013

TUTORIAL: Día de los Muertos Brooch

Hoy es el Día de los Muertos, or today is Day of The Dead.
Celebrate this Hispanic-originating holiday or just craft this up for fun!
(Glitter mandatory!)


Pin It Now!

Sunday, October 27, 2013

DIY 1950s Costume

Here is another decade fashions costume idea!
This time... the 1950s!


Pin It Now!

Sunday, October 13, 2013

DIY 1920s Costumes

A Great Gatsby- inspired tutorial just in time for Halloween!

Here are the 2 looks I put together! Click on the video below to see how!


Pin It Now!

Thursday, October 10, 2013

Homemade Alice in Wonderland Costumes

Hey everyone!
So 2 years ago my family decided that we would all dress up as characters from Alice in Wonderland.
I wanted to show you the costume-making process of the Queen of Hearts costume and Alice costume.
Everyone helped out to make the costumes! (Mom, Dad, Grandpa...) 
...and they turned out to be a huge success!

Here we are! (*Were... this was 2011)

QUEEN OF HEARTS COSTUME:
For my mom, who dressed up as the queen of hearts, we thrifted this floor-length black silk dress, some black heels, and she wore a black coat on top for warmth. A lace choker was also added to the look.

We also thrifted some red velvet and cut it into a large heart. We ironed some interfacing to the back to make it stiff and hot glued some gold trim around the heart. Then, we secured it onto the front of the dress with some safety pins.

For the sash, I bought some thick red silk ribbon, about 2 yards in length. I hand drew some hearts and spades onto a scrap of freezer paper and cut the shapes out with a craft knife. I then ironed the freezer paper to the center of the sash and filled the shapes in with black fabric paint. (More on freezer paper here.)

A mini- crown was made by cutting a 12" by 4" strip of poster board, taping the ends together, and spray painting it gold. 

ALICE COSTUME:
We found hideous semi-formal/bridesmaid dress at the thrift store for Alice. We also thrifted a white blouse to go underneath. As soon as I got home, I removed the lace from the waistband of the dress and made it into a choker necklace for Mrs. Queen of Hearts! 

I made the apron out of white fabric, but you could use a cotton sheet. 1. Sew 2 bodice pieces right sides together, (except for the bottom) turn right side out and attach to sash. 2. Sew 2 large rectangles together right sides together, leaving the top open. 3. Turn right side out and make a gathering stitch across the top. 
4. Attach this to the sash; the same side as you attached the bodice. 5. This got cut off, but I simply attached a strap for the neck. 6. All done! Sorry that wasn't very descriptive! Leave any questions in the comment section below.

To complete the costume, I tied a black ribbon around my hair, wore a stopwatch-necklace thing, and black flats. Here was the finished look! (And my old room)


Pin It Now!

Wednesday, October 2, 2013

DIY Cardigan

Finally!
How to piece together your cardigan using the pattern I showed you how to make in part 1 and 2.


Pin It Now!

Monday, September 2, 2013

Pattern Making Part 2

Learn how to make a pattern out of a garment you already own.


Pin It Now!

Monday, August 19, 2013

The Pattern Making Basics!

In this week's video I will teach you about the basics of pattern making 
and also about grain lines in fabric.

Pin It Now!

Friday, August 16, 2013

DIY Chalkboard Table


Chalkboard paint has been quite a 'trend' in the DIY world recently.
When I noticed my old wooden table was looking well, old, I decided to give this a go:


Supplies:
~table surface
~spray paint
~chalkboard paint (got mine @ Michael's)
~chalk
~painter's tape
~foam paint brush

First off I spray painted the top black.
Then, I taped off the sides and spray painted the legs white.
(Not my original design, but I ran out of black spray paint.)
Next, I taped off the  four edges of the table top
 ...and sectioned it off into 2 rectangles. 
I then painted the first layer of paint and let it dry for 2 hours I think,
according to the instructions. 
After that I did 2 more coats.
My instructions required me to 'condition' the chalkboard
surface by rubbing chalk over it and wiping it off.
That's it for this project! Leave any questions or comments below!


Pin It Now!

Tuesday, August 13, 2013

DIY Denim Lunch Sack

Upcycle old jeans, a belt, and a few scraps of leather or vinyl to make a stylish lunch bag just in time for back to school.


Pin It Now!

Wednesday, July 24, 2013

Striped Nail Tutorial

Black & white is on trend! Wear it on your nails :)


Pin It Now!

Friday, July 12, 2013

DIY Punk- Inspired Pins!


Pin It Now!

Wednesday, July 3, 2013

Constructing a Skater Skirt


Pin It Now!

Monday, June 24, 2013

DIY Beaded Bracelets

I haven't done a picture tutorial in a LONG time, so here is one just for you!

You will need:
+elastic string+
+beads+
+scissors+

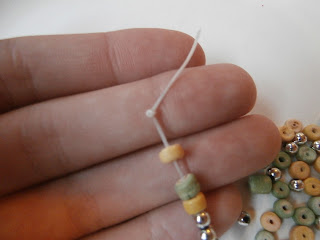
Measure elastic string to go around your wrist with a few inches extra.

Tie 3 knots at one end of the string.

String your beads in the pattern of your choice above the knot very carefully.

Add on beads until it can wrap around your wrist.

Tie it off with MANY knots. You're done!


Pin It Now!

Monday, June 17, 2013

DIY Foam Stamps


Pin It Now!

Sunday, June 9, 2013

DIY Art Deco Nails


Pin It Now!

Sunday, June 2, 2013

Come and check out my YouTube channel!


Pin It Now!

Sunday, May 26, 2013

DIY Leggings with a Waistband

How to sew leggings!
Inspired by the great tutorial on Sweet Verbena.
You should check it out!


Pin It Now!
Saturday, May 11, 2013

Upcycle your old shoes!

Check out my new vid :)

Pin It Now!

Sunday, April 28, 2013

DIY Daisy Nails

It's been a while since I've done a nail tutorial! 
Expect to see more because I purchased a tripod :)
Enjoy!


Pin It Now!

Sunday, April 21, 2013

DIY Dictionary Pendant

Upcycle a thrift store dictionary or an old book! 


Pin It Now!

Thursday, April 11, 2013

DIY Knit Top


A perfect project for amateur sewers (But like sew-er and not 'sewer'. Ew.)
Watch on YouTube ;)


Pin It Now!

Saturday, April 6, 2013

Making Sushi

Do you remember my Spring/ Easter post where I showed you a picture of my vegetable sushi? 
Just in case you didn't, here it is again!

It was easier to make then I thought! (And it was a big hit!)
However, I didn't make a tutorial, but I found a good post on another site.


Have a delicious day ;)


Pin It Now!

Monday, April 1, 2013

Spring Craft Ideas

Create place cards for your Easter guests from colored note cards and a festive stamp.


I made vegetable sushi for the first time! It was actually somewhat easy :) Practice, practice, practice!


To make a watercolor egg: 
1) Lay a hard boiled egg on a napkin or in a container
2) Drizzle the egg dye over the egg with a fork or another object of some sort
3) Let dry, peel & eat!

Happy Spring!!!
Pin It Now!

Friday, March 22, 2013

DIY Floral Crown

Get in touch with your inner Tavi Gevinson / hipster / Lana Del Rey ;) 
DIY Floral Crown


Pin It Now!

Sunday, March 10, 2013

DIY Square Knot Bracelet

Everyone loves a bracelet! Here is a video on how to make a square knot bracelet! 


Pin It Now!